Followers

Tuesday, December 2, 2014

My First Craft Show

My lovely daughter, sister and I took part in a local craft show on Saturday.  We had an early morning 7:00 am unload...set up and a      Hardy 's breakfast. Since this was my first experience, I wasn't sure how things would go.  Here are a few things I learned:

  1. Don't take too much inventory
  2. Try not to crowd your table/desplay
  3.  People in our area like nature/natural.
      Crafts.
  4. Don't be afraid to give people
      suggestions about how to use your
      items.
  5. Sometimes your highest priced items
      sell the best.

Here is a look at our top sellers.

Will I do it again?  I think so...maybe this Saturday at a local school.  Maybe I can sell the extra things I had left over.  Of course you know me I'm Curious . ...so I'll have to try a couple new things.  All in all it was a great experience , I loved meeting customers, other craters and spending the day with my daughter and sister..  

Be Curious and try something new!
Happy crafting


Tuesday, November 18, 2014

Snowmen Tea Lights

I made these last year and attached them to a gift card for my nieces & nephews.  This year I tried something different. Supplies you need; tea lights, daisy white card stock, blush ink, sponge/dabber, orange sharpie/marker, hole punch
  (1 1/2"), small hole punches, white gel marker, Cricut cartridge (Paper doll dress up), stamp set (To you & yours).

For the face I punched out a circle 1 1/2", in the center punch a small circle (to fit over the nose. I use small hole punch for eyes (added highlights with white gel pen) and drew on the mouth. Use blush ink to give them Rosie cheeks.

I cut the hats from the Paper Doll dress up cartridge. I cut them at 3.12" high. Added holly to hats. Stamped holly from (To you & yours) colored & cut out one leaf for each hat. I used Wink of stella pen to add some sparkle to berry. I added ribbon, yarn & twine to make scarf. 

You can add string for a hanger or a magnet.  There are so many different ways you can make these.  Be Curious and give it a try. Would love to see what you come up with.  Enjoy!

Monday, November 3, 2014

Christmas Time

Hey everyone.  I have been busy working on things for a craft show these last few weeks.  This is my first  craft show so if any of you guys have any hints, suggestions, or advice please Leave me a comment.  Here are some pictures of some of the things I've been doing.

Sunday, October 19, 2014

Fall

I Love Fall.  The colors, the sound of leaves crunching under your feet, the crisp chill in the air and the blue sky.  Here is a project I made for my home.  Flower pot, straw hat, burlap, felt, buttons and some fall flowers.  I made this also for my two sisters birthday and added real flowers.  They loved it.
Be Courious and give it a try.

Friday, October 17, 2014

CHRISTMAS ELF

Tic Tac Holder


That's how its been in my house lately "A CIRCUS" full of monkeys!
Sorry ladies I've been trying to get this post done all week...but...

I got this idea from a You Tube video by Dawn.  I think her channel is Stampingwithdawn.
I had to change it up because I don't have all the punches. I Love my Cricut!  I am still using the Expression and my Gypsy. (just holding my breath that it keeps working)  So sad that they are not supporting the gypsy anymore.  Well here goes. I hope this helps you make some cute Elves!

Supplies Needed
Cricut machine
Cartridges: Art Philosophy & Artiste
Card stock
B & T paper (I used scraps)
Window sheet ( I used packaging material )
Sticky notes
1 1/2" circle punch
Small paper punch (different sizes )
Tic Tacs (I used the lg,)
Adhesive

Cut the following shapes

Face:   Shape # 6 at 1 1/2"  Art Philosophy pg. 27
Ears:   Accent #4 at 1/2"  Artise pg. 54                
                                          Hat band:  Shape #4 at 1 1/2"  Art Philosophy pg. 56                                            Hat:  Banner #4 or 5 at size of your choice  Art Philosophy pg. 49 & 59
Shoes:  Same as ears
Eyes & Ears small paper punches

Supplies
Cuts

Putting your ELF together

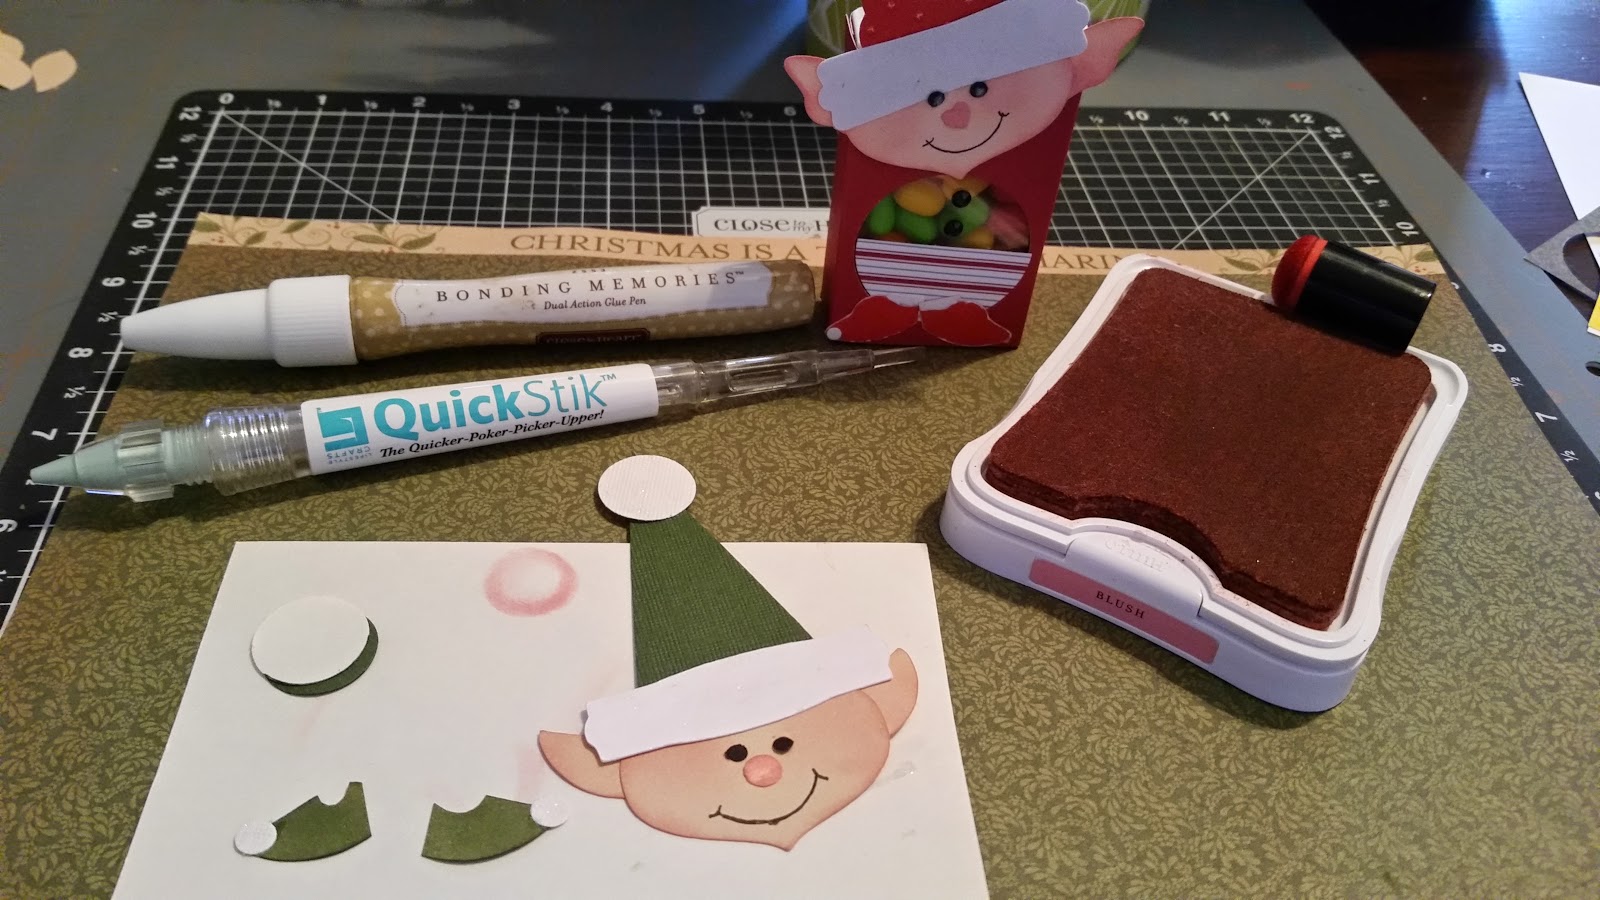
I inked the edges of face, ears, and nose with blush ink and added some rosy cheeks also.
I used champagne CTMH card stock for the face & ears.  You can use a pale pink if you want but I ran out. Hat & shoes are cut from old Olive.  The eyes & nose I punched using a regular hole punch of different sizes  I put together my elf then worked on the Tic Tac holder.
I used CTMH glue pen and my "QuickStick"( I just love this could not live without it) I helps you pick up & place the small pieces. ( I got mine at Creating Keepsakes convention last year)
To make the smile I used a 3/4" circle punched out to trace around & keep it just right.
For the shoes : Turn the ear shape upside down, cut off a small piece for the backside of the shoe, then cut a little semi-circle in the top to make it look like a shoe. I added a 3/4" circle at top and use a "wink of Stella" pen to add some sparkle to it and the hat band. I used a white gel pen to add highlights to the eyes & nose.  There now you have a cute little ELF.  You can change up the colors and hat shapes, add glitter or use glitter paper for some of your pieces.  

Now to make the Tic Tac holder.  You need a piece of paper cut 2 3/4" by 5 1/4".  
Score at 5/8", 2 3/8", 3" and 4 3/4".  Once you do this you will see that you have a small area at your last score mark. this is where you put your score tape.  Next with your score tape on the left side, you will need to punch a hole with your 1 1/2" punch.  First I punched the circle from a post it note with sticky part in the circle. I put the sticky note on a piece of card stock (makes it easier to punch).  Then I place the sticky note circle on my paper so I can get it in the center. Remember to leave enough space at the bottom to add your shoes.  Once your hole is punched turn you paper over & add you window piece. I cut mine a little less than 2" x  2" and used my tape runner at top & bottom to adhere it.  Now punch out a circle of decorative paper ( I used last years CTMH Pear & Partridge)  Cut the circle in half & adhere to front bottom of the window.  Add two small black pearls above the paper (onto the window sheet).  Then add your ELF and the shoes.


CHRISTMAS ELF


I hope this has explained well enough. Sometimes I feel like I am just rambling!  Hope you guys enjoy make these sweet Elves.  You can use them for many things.  Please be kind and like this post .  I would love for you guys to post the Elves you come up with.  

Be Curious!


What else can you think of to use these cute elves?  Follow my blog and you will see some other things I have used my Elves for.  Happpy Crafting!


Wednesday, September 24, 2014

More Leaves.

I know too many leaves...but I just can't help myself.  I find inspiration in nature at lot for the art I create.  On my morning walk Tuesday I found these leaves.

I just had to try and see if I could make some.  So here's the supplies I used to make leaves.
  • CTMH Inks; Flaxen, Sunkiss Yellow, Honey, Buttercup, Pear, Sweet leaf, New England Ivy and Coco
  • Arcylic block, spritzer with water and water color paper
  • Outline leaf stamp 
I tried many..many...times & ways to get the look of these leaves, I especially liked the veins and how they kinda bled into the leaf.  I found that it worked best to ;
  • Put your ink onto the block, spritz with water and stamp on water color paper (I also spritzed the paper...caution....just a small amount )  I dried the ink between each addition of color.
  • I just played until I got a combination of colors I liked.
  • For the veins....the hardest part.  I almost gave up on this one.  I tried different inks (distress, pigment and our classic inks)  I found that ours (CTMH) worked best.  I used our small distress ink pad to do part of the stamp, then used New England Ivy on the rest....used ink daubers to apply. To stamp the image, I spritzed the paper (with the color on it.)  then I just rubbed the water on the paper to make sure it was coated well ,but not too wet.  Then I stamped....held my breath...and watched the magic happen.  I used my heat gun to dry it when it had bled enough. Ta..da... My leaves!

Then I decided to make my granddaughter a card.  She was so nice to help me make some birthday cards last night.  So I made this card.  Here are the supplies I used.
  • Craft card stock for the base, Skylark (one of my favorite paper packs) and Flaxen (new color)
  • Stamp sets; You are my Happy and This is Good
  • Flaxen and Coco Inks
  • Yellow fibers and bakers twine I had in my stash..also a Wink of Stella pen for some shine. I used a 3"x3" base to attach my fibers and leaves to with a tape runner,


Please leave a comment below if you liked my card or have any questions.  Supplies and more inspiration can be found on my website Here
Stay Curious Ladies!

Monday, September 22, 2014

Post-it-Note Holders

Post-it-Note Holder with pen


More leaves...I Love my leaves...I am having so much fun with my leaves!
I have been making some things for my first Craft fair coming up.  Feeling nervous and excited. If any of you have any advice or suggestion for a newbie please let me know,
Supplies I used for this project
  1. Post-it-Notes
  2. Ink pen
  3. Twine
  4. Autumn terracotta card stock
  5. Autumn terracotta ink
  6. Stamp set "This is Good"
  7. Sequences (colored with Terracotta marker)
  8. A 3 1/2" x 5 1/4" Acrylic picture frame holder
To make this set, I cut a small piece of cardstock to match my paper. I took the ink tube out of the pen, put some adhesive down the strip with my ATG gun, and just roled the ink tube in the paper. Then I just slipped the ink tube back in the pen.  Like magic you have a designer pen!
Cut your paper 3 1/2" x 5" to insert into the frame..  Cut your card stock 7 1/4" x 3 1/4" ( I made mine to open up instead to the left) On the 7 1/4"" side of card stock score at; 3" and at 3 1/4".  Fold along your score lines.  I added a piece of ribbon for a pen holder . Do your stamping and put things together,  Remove the backpiece of paper from your post-it-note and just stick it to your cover. Adhere the post-it-note and cover to the frame with a strong adhesive. I used my ATG gun.  I added my sentiment to the top of the frame and emblished the front of the holder. Added my leaves, some twine, sequences and sparkles. I also colored my gold sequences with a terroccta marker. This would make a nice gift for someone or a stocking stuffer. Cute, easy and inexpensive. Here are a few more I have made using my Leaves.

Fun project.  Be curious and give it a try.  Keep Crafting. Be sure to let me know what you think in the comments below.  I would love for you to like this post and follow my blog.
Be Curious!

Sunday, September 21, 2014

Fall Cards

Fall Cards using my Homemade Leaves

Fall is my time of the Year......the deep blue sky, the chill in the air, football games, the changing colors in the trees, the sound of leaves under your feet.  I saw a technique on You Tube by Dawn5377 and I Just had to try it. I hope you enjoy this tutorial and take the time to try it.  Please let me know in the comments section what you think or if you have any questions.  I would love for you to follow my blog and share with me as we do what we love.

CTMH Suplies I Used
  • Card stock; Colonial white, Ponderosa pine, Autumn Terricotta, Gold rush, Barn red, Flaxen
  • Inks; Olive, Bamboo, Desert sand, Cashmere, Honey, Autumn teraccotta, gypsy, Indian corn
  • Pearl paint, Honey re-inker, spray bottle
  • Twine, Burlap ribbon
  • Stamp Sets; Distressed Backgrounds (chicken wire), So Grateful, The Present, Treasure Life, Huntington (wood grain, leaves)
  • My homemade Leaves
Non-CTMH Supplies
  • Spellbinders leaf dies
  • Embossing folders
  • Leaf brads
To make your cards cut your card stock at 11" x 4 1/4" and fold in half for your card base.
Cut a piece of Colonial white 5 1/4" x 4 to use as your background.  To make the background I just stamped with multiple stamps and inks to get the look I wanted.  Let it dry for awhile then mix a small amount of pearl paint and a drop of honey re-inker on your craft sheet. I took a dry paper towel scrunched it up and dabbed it in the paint and applied it to my background sheet. Assemble back ground to card base. Add a strip of burlap ribbon. You will have to use a strong adhesive to stick down the burlap.  I used score tape,Then I cut a 3" x 3" piece of card stock to place my leaves and sentiment on. On the inside I added a piece of 3 3/4" x 5" Colonial card stock to stamp my sentiment and image.  I also stamped a image on the front of my envelope to match my card.
My favorite thing about the card (besides my leaves of course) was making my background.
I hope you take time to try this technique.  I would love to see what you c ome up with. Please feel free to share a link to your art work in the comments section.
Stay Curious Crafters!

Fall Coffee Filter Wreath


This is my version of the Coffee Filter Wreath.  I did some research online and came up with my own version. All the leaves I made were prefect for this project.  List of supplies I used:
  1. Leaves that I made
  2. Coffee filters ( I used 150-200)
  3. Cardboard (I used 12 x 12 backs from paper packs
  4. Foam Wreath for my circle
  5. Re-inkers (barn red, cranberry, sunset, Autumn terracotta)
  6. Container to put inks and coffee filters
  7. Hot glue gun and sticks
  8. Burlap ribbon, twine
  9. Banners

To color the coffee filters I put the ink and water in a container to make the color I wanted. You don't need much. Put the filters in the container upside . They soak up the dye quickly.  If you want a darker color around the top of filters add just a small amount of ink and water. Filters will dry lighter. To get the brown color I used old strong tea. I couldn't find the natural color ones. Using them would save some time.  To dry I just tossed mine in the dryer for a few mins. They may be a little wrinkled but all you have to do is just lay them out and fold them.  The fold I used was; fold in half, then in half again, then in half again.  Then I set them aside.
To make my frame I used cardboard from paper packs (off the backs) I traced my shape using a foam wreath. I make three and glued them together. I used a glue gun to attach the filters to the frame. When you glue them, just glue the tips (pointed ends) because you will have to pull them up when you get close to the end.


I kinda started in the center and then put one filter on each edge. As I added filters I over lapped them so that only a small part (of the one under it) showed (1/4" to 1/2 ")  Decide where you want the colored "flowers" to go and add them in. When you get to the end where filters meet you will have to bring the filters up an add the rest of the filters until wreath is full.  Once all the filters are on just fluff them up until you get the fullness and shape you want
Once your wreath is finished, you then add your leaves.  I made groups of them and glued them together and then added the to the wreath.  I added my burlap ribbon to make a hanger then added the bow. I also made a bow out of twine and added it on top of the burlap bow,   Thought I was finished and a day later I decided I wanted a banner.


I hope these instructions will help you if you decide to give this a try. You could also use real leaves and fall things you can find around this time of the year. Also you could use artificial leaves and fall items from your local store.  Please leave a comment if you enjoyed this post or if you have any questions.  I would love for you to follow my blog and like this post.  Keep crafting my friends and most of all......Be Curious!
You can find more information about the products I used on my website here

Saturday, September 20, 2014

Fall Coffee Filter Wreath

I've been wanting to try a coffee filter wreath for a while now. I decided that my leaves would be perfect for this fall wreath. I hope you guys like it. If you want more information leave a message in the comments below. Be Curious!

Playing With Leaves


I just love Autumn...the cool crisp weather, the deep blue sky, and the changing color of the leaves.
Making these leaves I used mostly CTMH supplies, the exceptions were two leaf stamps I had, a couple embossing folders,Cricut cartridges,Glitter and some distress inks by Tim Holts.  
This is a list of CTMH supplies I used
  1. Inks (Exclusive & pigment)
  2. Re-inkers
  3. Create-A-Shade Paint (Pearl)
  4. Stamp Set Fall Harvest (C1504)
  5. Card Stock
  6. Embossing Folders ( Wood grain, Chevron)
  7. Clear embossing powder
  8. Heat gun
  9. Art Philosophy Cricut cartridge
  10. Sanding Kit (Z1294)
  11. Sponge (Z697), Sponge Daubers (Z726)
I used the colors of card stock & inks that I liked. Some if the colors I used were; Olive, Barn Red, Honey, Sunset, Autumn Terracotta, Goldrush, & Colonial white.
Supplies
I used 3 layers of cardboard for my wreath base. I used the foam wreath to trace for the shape.
I embossed with folders and embossing powders. I stamped with pigment inks (barn red & coco)
and used clear embossing powder.  With the folders...some of them I left plain , some I sanded and some I inked.  Most of the leaves I used a sponge or dauber to apply the inks, some I did as water color, some inked over the clear embossing and some I sprayed with sprays I made with the re-inkers.  I added some of the pearl paint to some of the sprays to make them shine and of course I had to try some glitter.
Embossing Folders
I think the Chevron turned out to be my favorite!
Sanding the embossed patterns
CTMH paper is great for this technique!
I inked some of them with our distress ink.
These I sprayed
You can see the shine from the pearl paint!
I Love it.
I think these are my favorite. I used VersaMark ink pad and just ran it over the raised part of the embossed patterns, added clear embossing powder. I sponged these with pigment inks and used a baby wipe to wipe off the excess. Pretty!
These I used just pigment ink & a dauber.
These I used our glue pen and added where I wanted the glitter to be. Then I sprinkled glitter on the glue.  Again the Chevron is my favorite!

Well that is my fun play time with my leaves. Watch for my next post to see what projects I have used them for. Happy Crafting!  Be Curious!
Give this a try, .. its so fun.  If you have any questions please let me know.
Please like this post and send me a comment so I know what you think. If you are local and are interested in classes please let me know below. If you need supplies you can find my website here
Be Creative...Be Curious!