Followers

Saturday, June 20, 2015

Muslin Gift Bag


Welcome to the Everything ABC's Blog Hop. This week the letter is M. This can be any element you use in your art work. Paper, inks, stamp sets, or embellishments.  If you just came from Catherine's Blog then you are on the right track.  If you should get lost along the way, you can find a list of everyone taking part in this Hop by visiting Linda's Blog.

My M elements for this Hop are the material and technique I have used.  I needed a small gift bag for a gift for my friend and decided to use one of Close to My Heart's Muslin Bags.  Of course I was Curious about what I could use to decorate it up a little (or a lot) so I decided to use a doily and some mist I made using CTMH re-inkers and alcohol. I also decided to try stamping and coloring the flowers I had stamped.  I really liked the way it turned out, except for my failed attempt to emboss on the muslin bag. (I think it would have worked if I had used a less detailed stamp). Decided to stamp my image and sentiment on a small tag to attach to the bag.   


Then I decided I needed to make a card and used the drolly from the mask on my bag. Some stamped images, coloring, a little bling and a butterfly and my card was done. ( I keep a box that has cricut cuts; butterflies, hearts, stars, and some extra stamped sentiments ) This makes it easy to make a card quickly when I need one.


For a list of supplies used in my project please check below. The next stop along the way is Lauren's Blog so hop on over to see what she has created.  Hope you enjoy all the beautiful and creative art work on this hop. Please feel free to comment on the projects you see.  If you like our art work and want to see more, please sign up / join our blogs so you won't miss anything.  Stay Curious and keep crafting.

SUPPLY LIST:
Card stock; Colonial White, Olive
Inks; Memento black, CTMH sunflower, Topiary, Lagoon, 
ShinHan markers; YR26, Y49, R140, B262, RP198, P282, R11, Blinder pen
CTMH Stamp Sets; #30 Years of Happy, Love This, A Happy Hello,
Happy Thoughts, A Garden, Treasure Life
My Creations Muslin Bags
CTMH seaside sequins

Misc supplies; dolly, clear sequins and Wink of Stella glitter pen

To purchase these supplies or check out other supplies we have to offer please visit My Web Site

Stay Curious and Craft On!

Friday, June 12, 2015

Self Closing Box


I must confess ........ I am a You Tuber!  I found this cute idea on Maria Fennely's channel.  Just had to give it a try using Blossom CTMH paper pack.  My curious nature ...... again.  This box is really neat it stays closed until you push in the side of the box and when you let go it closes again.  It would great for a small gift, jewelry, Candy, flower seed packs, gift card ..... lots of things I can think of.  Don't you just love the colors. I used CTMH's "Love This" stamp set for the flowers, butterfly and sentiment.  So Cute!

Here are the instructions I used to make the box.
Start with a 8 1/2" x 6" piece of card stock. I used Daisy White so you could see the score lines and cut lines better. You will also need 2 pieces of 3 1/2" x 3 1/2" B&T patterned paper to decorate the box.  First thing you want to do is score your piece of card stock.

Along the 8 1/2" side score at 4" & 8" (you will have 1/2" on the end for tab)
Turn your paper to short side and score at 1"  & 5"
Turn your paper again and score at 2" & 6" just down to the first score line.

Next time you want to mark the "triangle" score lines (red lines), use a ruler to draw lines from the intersecting lines as marked.  It helps if you extend your score lines all the way off your paper. This help you line them on your paper cutter. I use red ink so it would show but you should use a pencil so you can erase the lines after you score them. Cut out the 2 rectangles on the right side to make your tab. and cut on the broken lines to make your bottom flaps of the box.

Line up your drawn lines on your cutter (as shown) and score all the red lines. 
This makes the shape of your box. you will have 2 V shaped areas when you are finished.

Fold all your score lines using a bone folder so they are nice & crisp. The center straight pencil line is the side of the box it fold all the way from top to bottom. 

Take your 3 1/2" squares and find the center and mark it. Cut from the center mark to the edge on both sides. You will end up with these shapes. You can turn the small ones over as I did when added to your box.  It's easier if you add these pieces before you put the box together. After you add these pieces add adhesive to the outside of your tab and put your box together.

This is what it will look like (with your B&T paper added)  I forgot to add mine until after this step.
Now fold in your bottom pieces. You may have to work with these to make sure they are square. Add adhesive to hold them together.

This is what your box will look like once it is put together.

Just push in on the sides to open and when you let go it closes back.  How cool is that!

Ta...Da..... A really cool box. You can decorate any way you want. I used the "Love this" stamp to stamp my floors on card stock, and the butterfly on a piece of B&T paper.  I also used the "Amazing" sentiment from the same set.  Made a couple banners and tied them onto my box with some ribbon.  to decorate my flowers and butterfly, I inked the edges added a Teal resin flower, some sparkles and aqua dots for the butterfly and added my leaves (cricut cut ... Art Philosophy)  Now I just have to decide what to put in my box.  I Love Crafting!  Close to My Heart has so many pretty things to play with.  Be Curious and go HERE to see all the "pretties"  CTMH has a great selection of products, project ideas and embellishments.

I hope you enjoyed this post and that it will help you make your own box.  I would love to see what you come up with. Please share your creation in the comments section.  I would love to hear from you and what you think of my pretty box.  If you want to keep up with my "Curious" adventures please join my blog or sign up with e-mail.

Be Curious and stay Crafty!

Thursday, June 11, 2015

Magical First


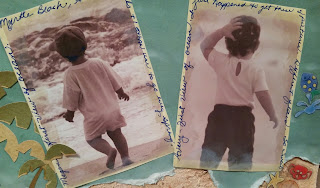
Those who know me, know that I have been working on moving for over a year now.  Trying to move 30 years of "things" has been so hard. ( especially for a borderline Hoarder). Anyway, during that process I found these two photos in frames that we had boxed up.  These are of my oldest two granddaughters seeing the ocean for the first time.  They were taken at different times and I thought it was neat that they were so much alike.  


I decided a scrapbook page was in order.  I wanted a background that reminded me of the beach. I Love to work with inks, so I decided to make a sunset. I used CTMH inks: canary, sunset, pixie, thistle, glacier, twilight and sky blue. I used a mask for the sun then just used a sponge to add ink until I got the look I wanted. I cut the "Magical" in the title with the cricut and the "FIRST" came from some acrylic letters I won at a crop.  The Ocean is make using twilight card stock and adding some inks to give it some dimension.  I tore the bottom edge to make it look like waves on the beach. I inked, sprayed with water and distressed the edges with my finger.


The sandy beach.....now that's a story in its self.  I made some texture paste myself and added saddle re-inker to give it some color.  This was a trial and error experience!  In the end I had to make the paste very thin and add it in layers (drying between) I added two layers then made some spritz with the saddle re-inker and gave it a spray or two. I also added a view drops of the saddle ink here & there.  I recommend using liquid glass to adhere the bottom of the "ocean" and the trees and other embellishments.   I added my journeying around the edges of the photos.  Now I have a page to share this memory with my family in the future.


I think it turned out pretty good. I love how the sunset and sky ended up.  My Curious nature did good ....... don't you think?  I hope you give something new a try. Find a picture that brings special memories back and make a page.  Thy something new to help express how you felt.  I wanted to share the wonder of the first look at the ocean brings.  How do you think I did?

If you are here and like my page, please take the time to like and comment .  If you would like to see more of my "Curious" adventures join my blog or sign up with e-mail.  You can go HERE to see all that Close To My Heart has to offer; high quality products at affordable prices, wonderful project ideas and business opportunities.  I would LOVE to have you as a part of my Team.

Be Curious, preserve your memories, and tell your stories.
Happy Crafting

Tuesday, June 9, 2015

Happy Scrapbook Layout


Recently I went with my Daughter on a business trip to Hampton.  To occupy my time while she was in her meetings I took some pictures and scrapbooking supplies. I was very productive and completed several pages.  This one was a "Curious" experiment . I had some birthday pictures and decided to make my own background paper. It's hard to see the colors but I used Pixie, Canary, Flaxin Glacier and Thistle CTMH inks (all the new colors)  I inked the top with pixie and the bottom two places with Canary and Flaxin inks. I didn't take many stamps so I used a pencil eraser to stamp with Thistle ink.  The banner at the top we found at Hobby Lobby in a sales bin. When I started to Make my title I realized that I did not have what I needed to make "Happy Birthday" As I was looking through my pictures I found these and the title "Happy" just seemed to fit and the colors went well with my background.  I used Flaxin card stock to mat my pictures. Took my Happy tied on some pink and white bakers twine, some embellishments and I think my layout turned out just fine.

You will be amazed at how productive you can be  when you limit yourself to just a few supplies.  When I packed I just picked some card stock, a couple CTMH paper packs, 5 different types of embellishments, some inks, a couple stamp sets, my pictures and some tools.  I found that I had much more time to create when I didn't have so many things to 'choose from".  Be Curious and limit yourself to just a few supplies and see what you come up with.  I would love to see what you come up with.  Please feel free to post your creations in the comments section.

While you're here take some time to sign up or join my blog.  I love to share my art work with you and get you comments about what I am doing.  Be a Curious person like me, I like to try new things, techniques, crafts, supplies and things that you would not expect to see.  If you follow my blog we can exchange ideas!  

Visit my Web Site  to see the wonderful products we have and see some great project ideas

Thought I would also share some picture of some flowers I took while we were there.


Thursday, June 4, 2015

Sparkle Lace Cards


Welcome to the Everything ABC's Blog Hop. For this hop we will be using the letter L. This may be the name of a paper, stamp set, or an embellishment. Whatever the crafter has chosen as their letter L element that will be featured in their post.  If you came from Darlys then you are on the right track.

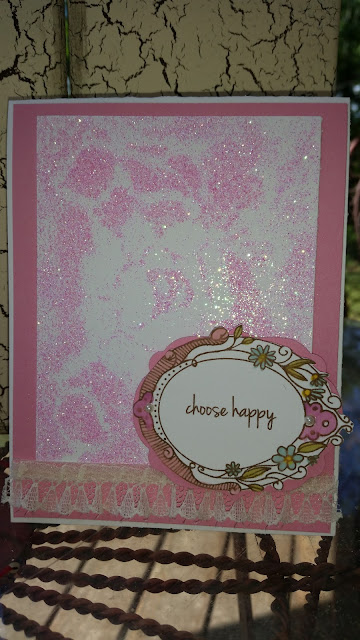
For my Letter L element I will be using Lace.   I love lace and glitter so I decided to use them both in the cards I made.
Used lace as a mask on this card and then added some lace to the bottom of the card also.

On this card I used the actual lace that I used as a mask for another card. Sorry you can't really see the color or shine so well in this photo. It turned out a beautiful green.

For these cards I used the lace as a mask on the card. I sprayed over the lace with adhesive and then added my glitter. Then removed the lace......then you have two elements....card front and lace for another card.  

The products I used are:  Close to My Heart card stock White Daisy, Pixie and Flaxen.  Stamp sets were Choose Happy and It's the Little Things.  I stamped the main image with CTMH Chocolate ink and used the following inks and our blending pen to color in the images.( Glacier, Pear, Olive, Pixie, Thistle, and Canary)   I also used some lace my sister had given me, spray adhesive, glitter (pink & green) ribbon and bling form my stash.  

I am last one on the Everything ABC's Blog Hop. I hope you enjoyed everyones art work today. In case you get lost along the way go to Here  for a complete list of participants.

If you are interested in Close to My Heart products and supplies or would like to become a member of my Team please visit me Here

Remember stay Curious and Keep Crafting!